How to create workflows in systeme.io
In this article, you will learn all about workflows and how to create them in systeme.io.
Creating a new workflow
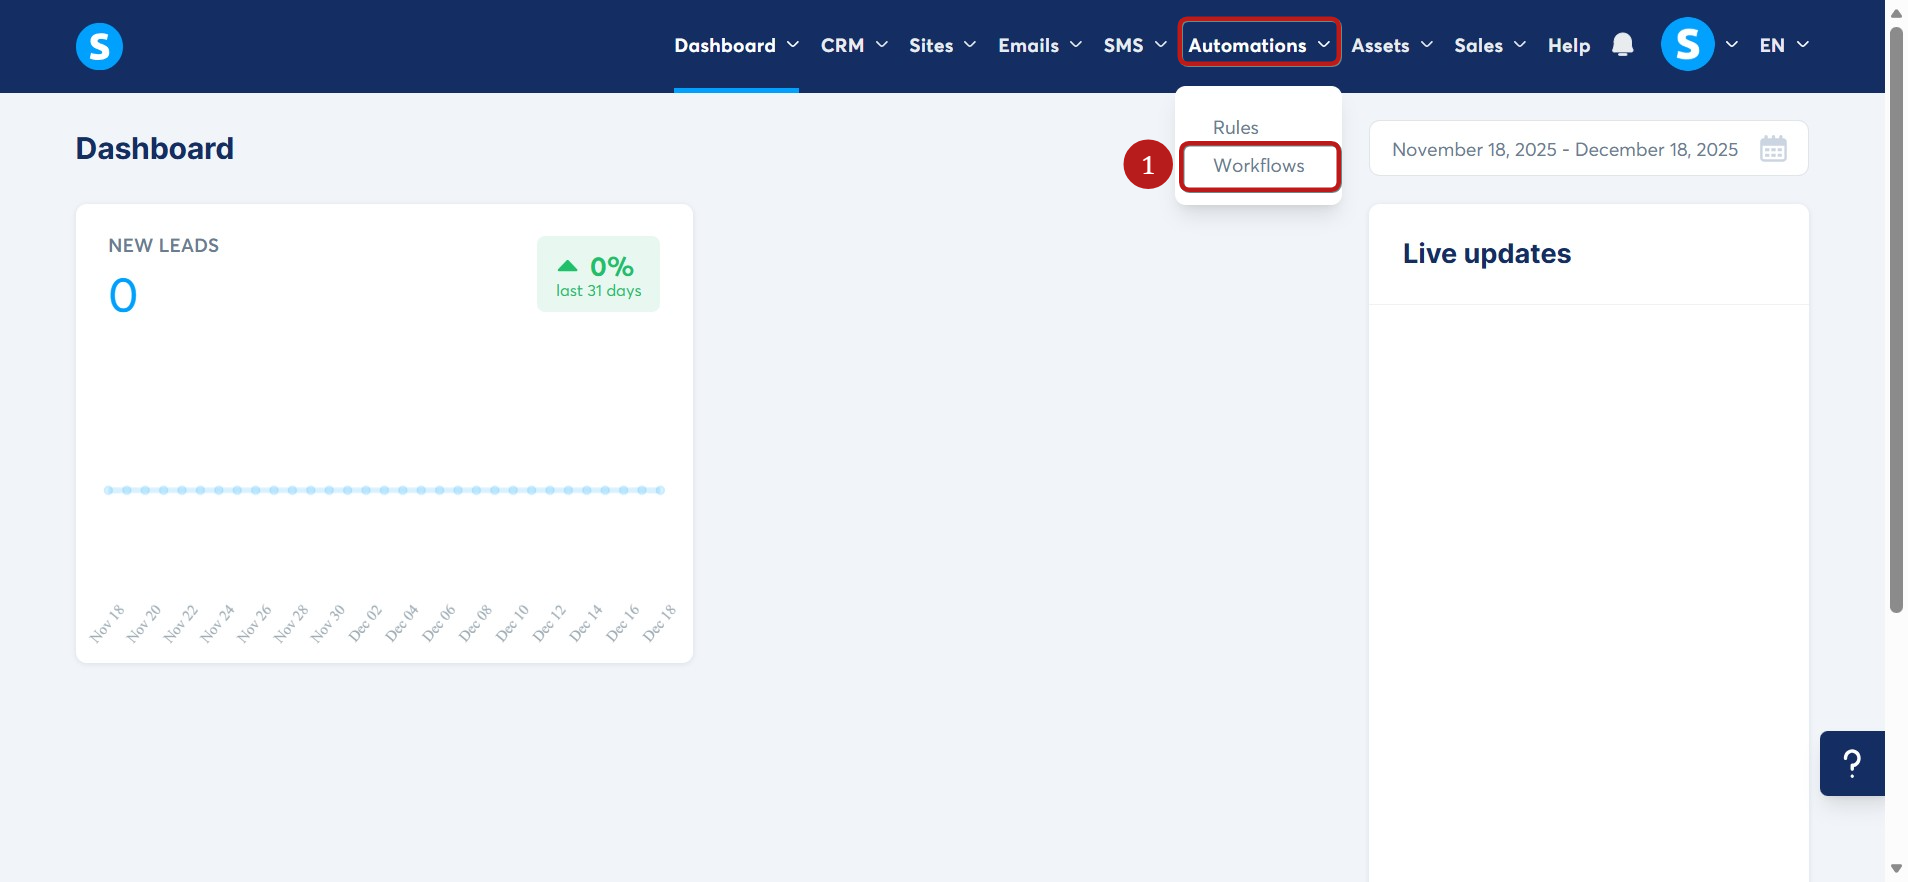
Log in to your systeme.io account, click on the Automations tab in the menu bar, then select Workflows (1).
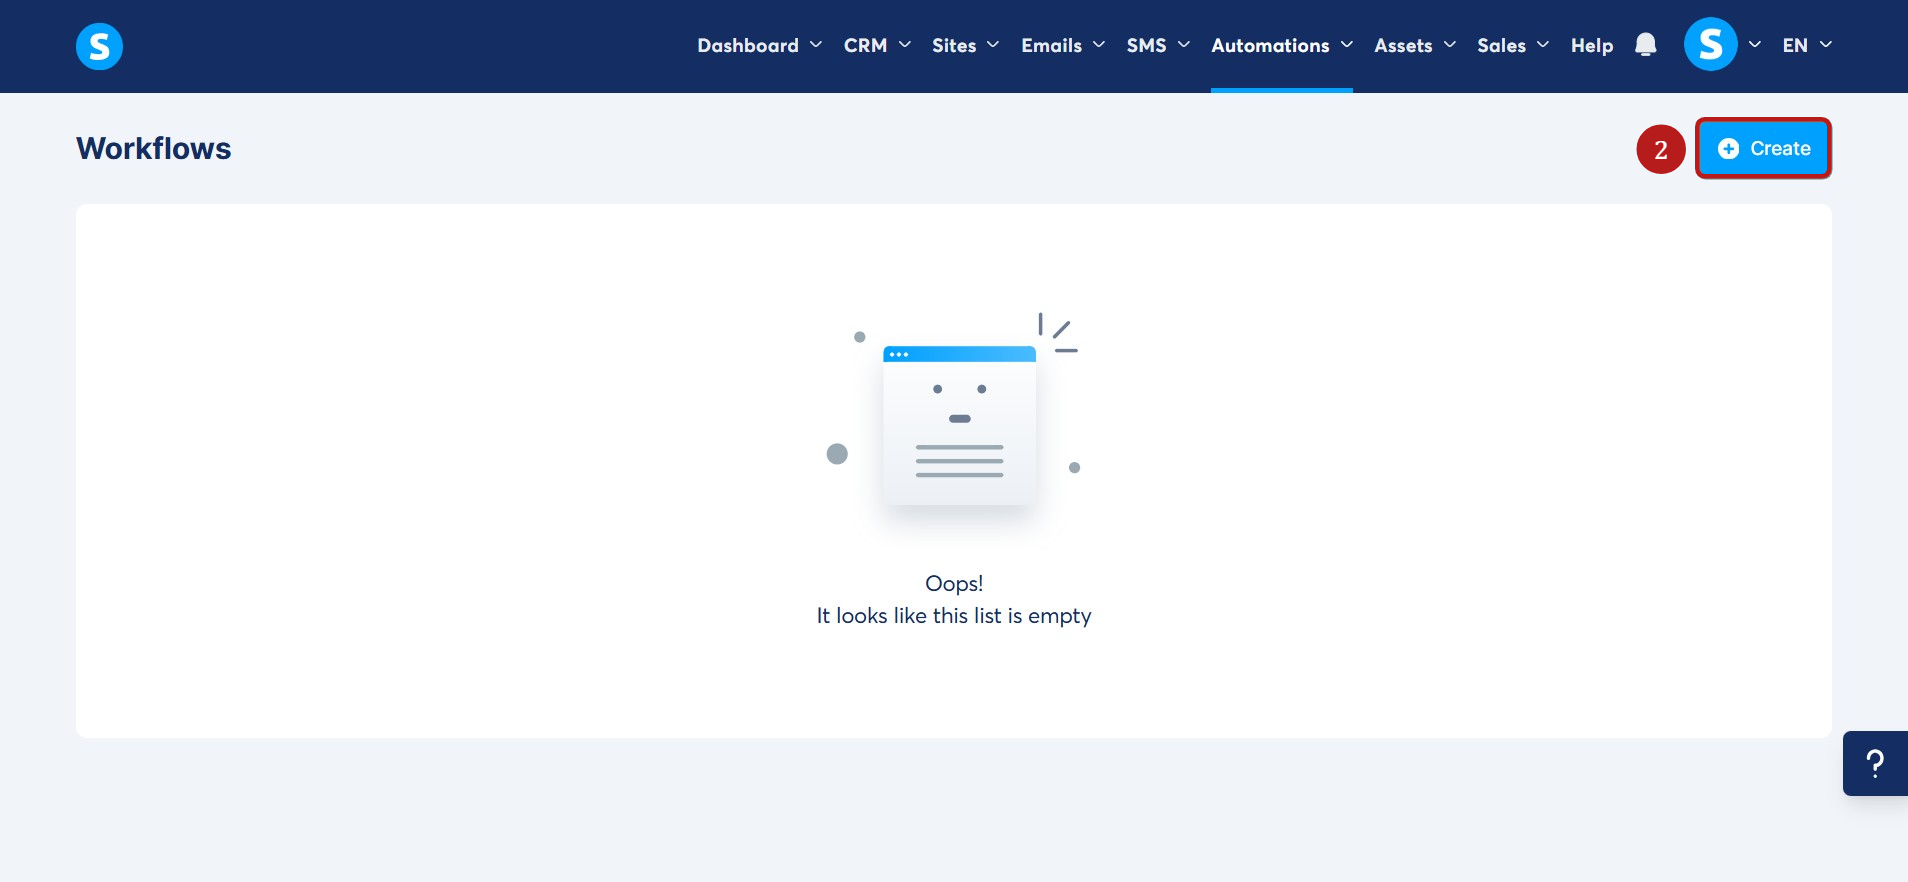
Click on the Create (2) button.
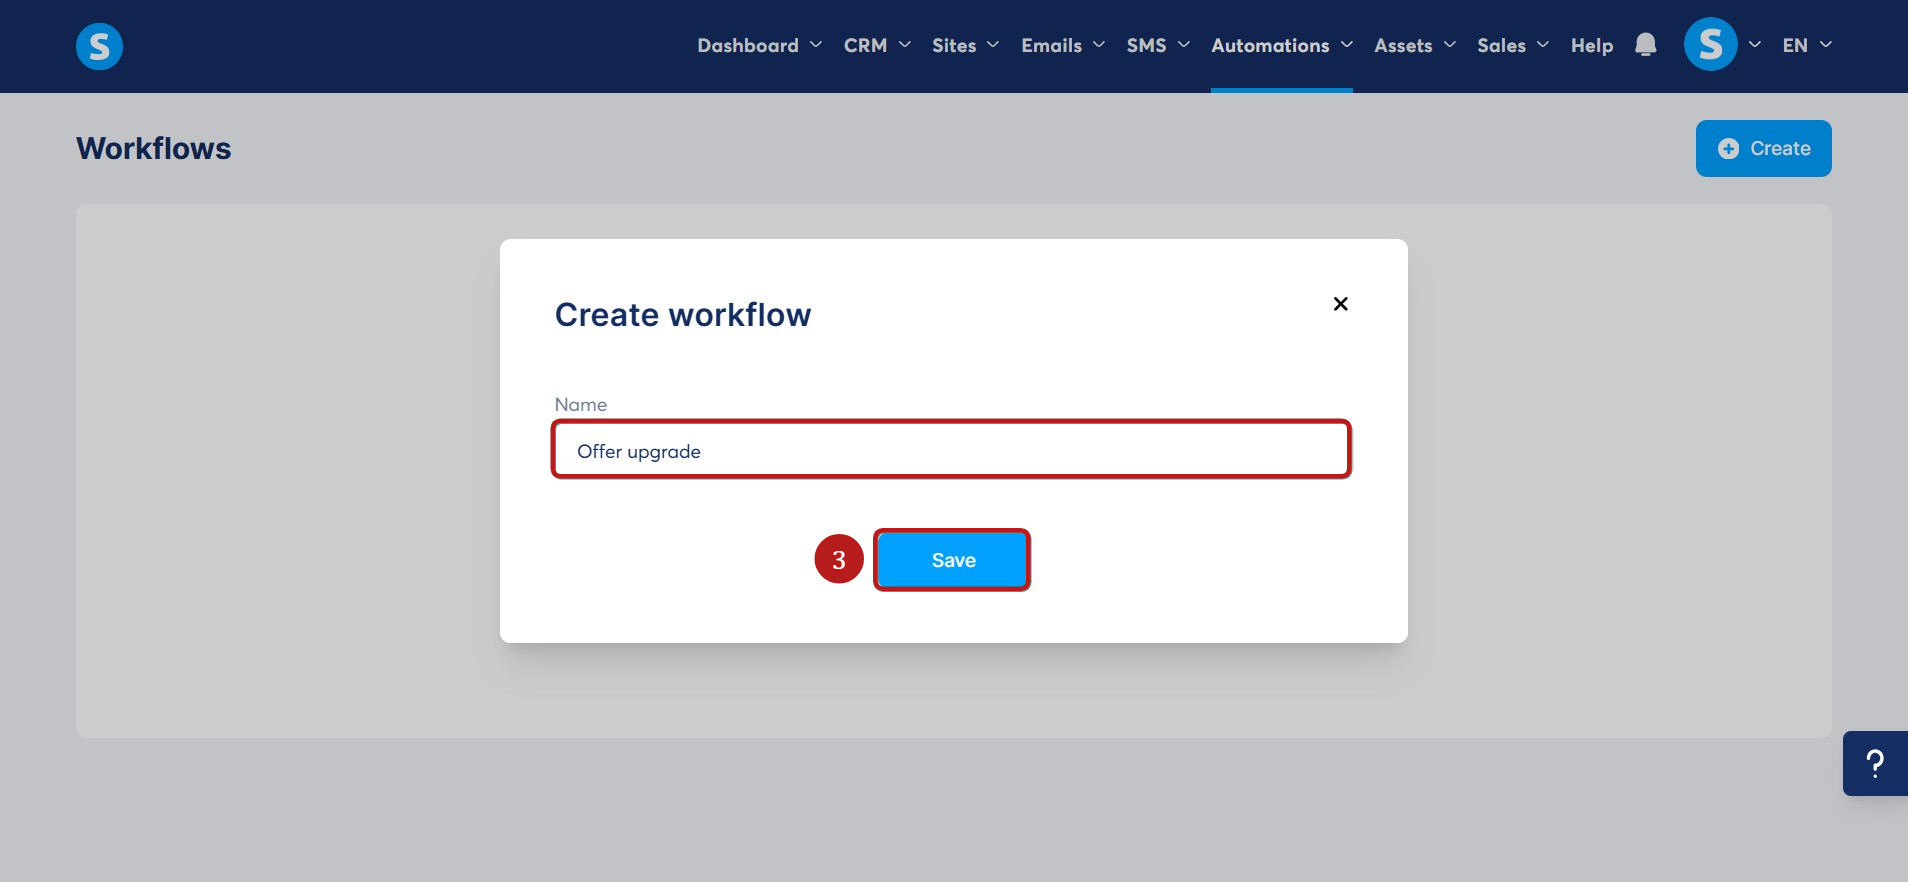
Choose a name for your workflow and click Save (3).
Now that a new workflow has been created, you’ll need to define triggers and assign actions.
- Adding a trigger
A trigger is an event that starts the workflow. For example, when a user purchases a product or subscribes to your newsletter.
To create a trigger:
Click on Create your first trigger (4).

A pop-up will appear so we can choose the trigger.

You can choose from the following trigger types:
- Meeting scheduled: When a contact schedules a meeting.
- Tag added / Tag removed: When a tag is added or removed from a contact after the workflow is activated (tags added/removed before activation are not considered).
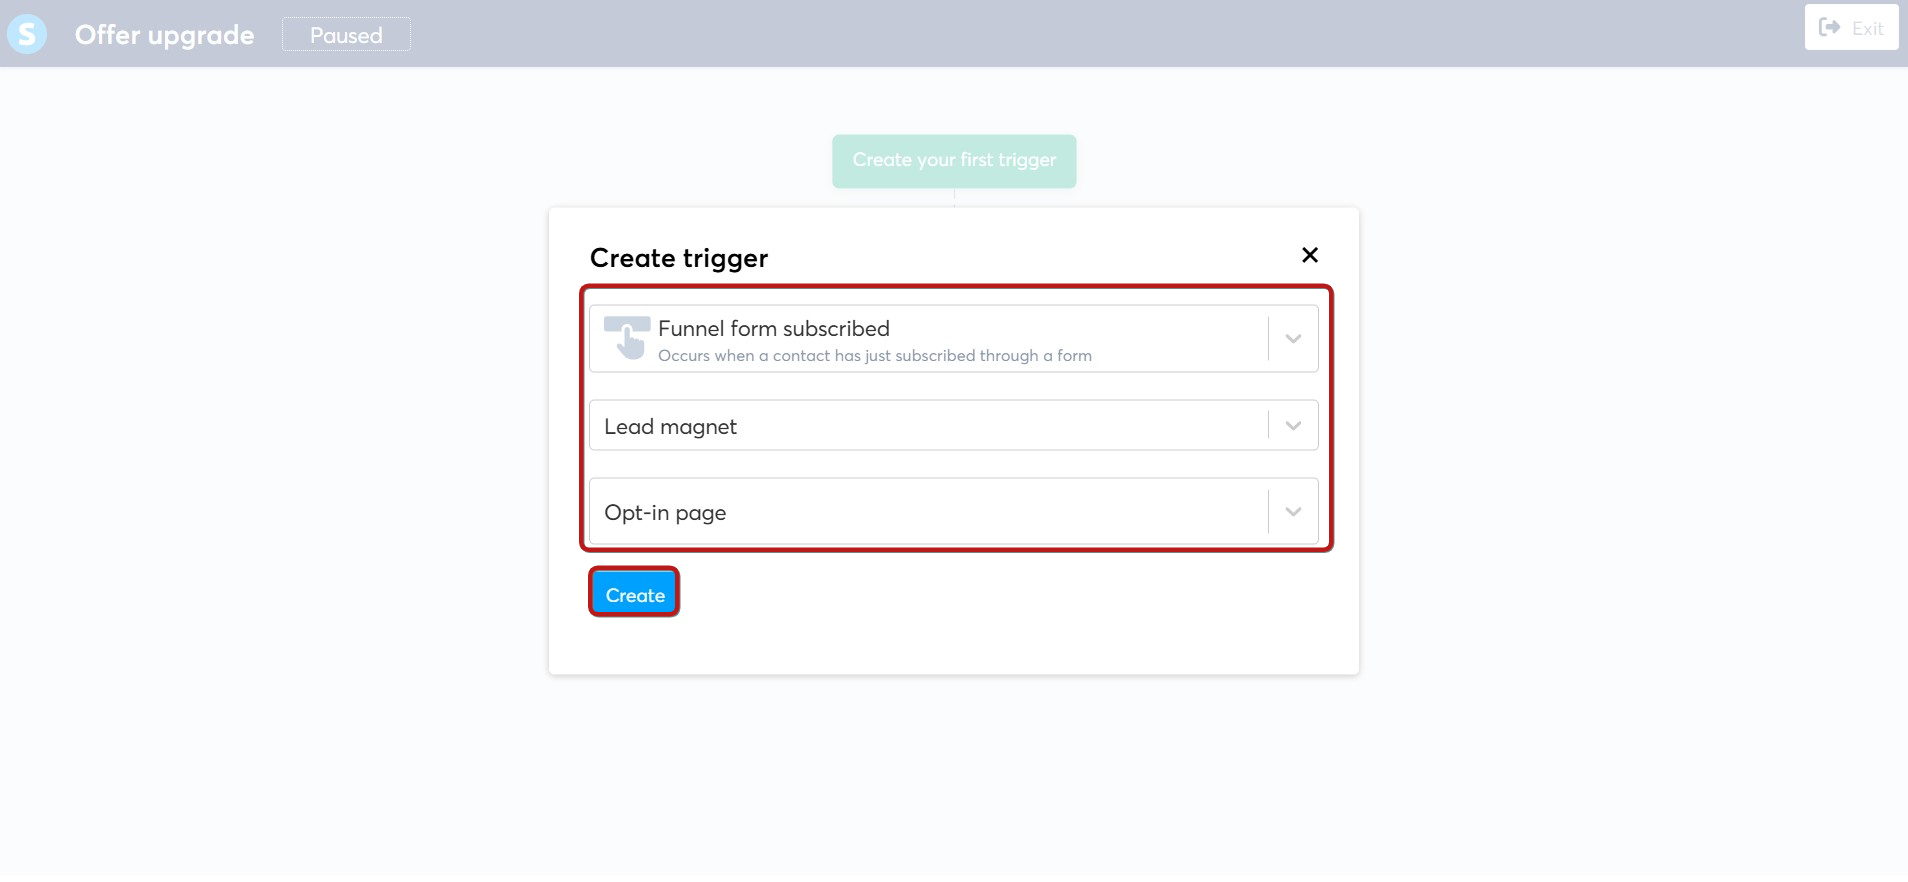
- Funnel form subscribed: When a contact subscribes via a funnel form.
- Blog page form subscribed: When a contact subscribes via a form on a blog page.
- Campaign completed: When a contact completes a campaign.
- Webinar registration: When a contact registers for a webinar.
- Enrolled in course: When a contact enrolls in a course.
- Course completed: When a student completes a course.
- Module completed: When a student completes a module.
- Lecture completed: When a student completes a lecture.
- Enrolled in a course bundle: When a contact enrolls in a course bundle.
- New sale: When a customer purchases an offer.
- Sale canceled: When a subscription is canceled or a one-time payment is refunded.
- Email opened: When a contact opens an email.
- Email link clicked: When a contact clicks a link inside an email.
- Page visited: When a contact visits a specific page.
- Enrolled in community: When a contact joins a community.
- Subscription payment failed: When a subscription payment fails.
- Creator store form subscribed: When a contact subscribes through the “Collect emails” section in the digital store.
Notes:
- Make sure to select a trigger for your workflow before adding any steps. Even though it is technically possible to add steps without a trigger, the workflow will not run unless a trigger is defined.
- You can define multiple triggers to occur simultaneously.
- Actions will only be executed if the trigger happens after the workflow is activated.
- For the Email link clicked trigger, the system applies a 1-minute cooldown after the first recorded click. This prevents the trigger from executing multiple times due to accidental double-clicks or automated background security checks performed by email providers (like Gmail).
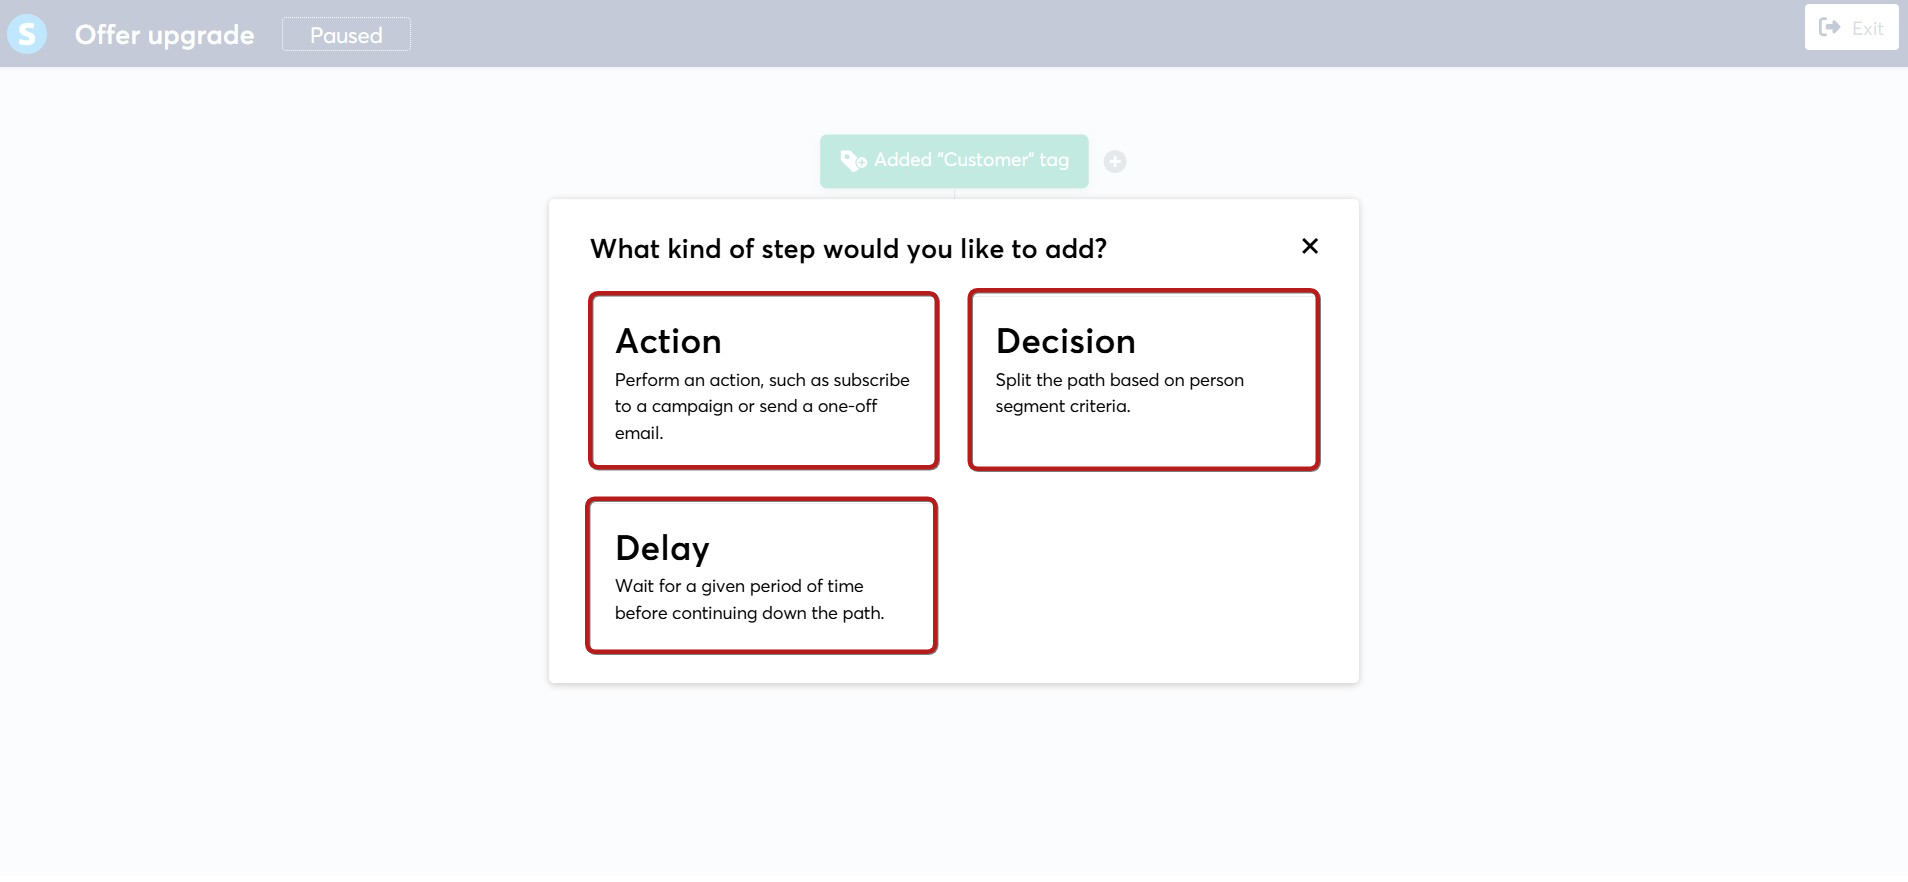
- Adding a workflow step
After setting up a trigger, click “+” to add the next step. You can choose from:
- Action: An operation performed in systeme.io, you can perform the following actions:
- Add a tag
- Remove a tag
- Enroll in course
- Revoke access to a course
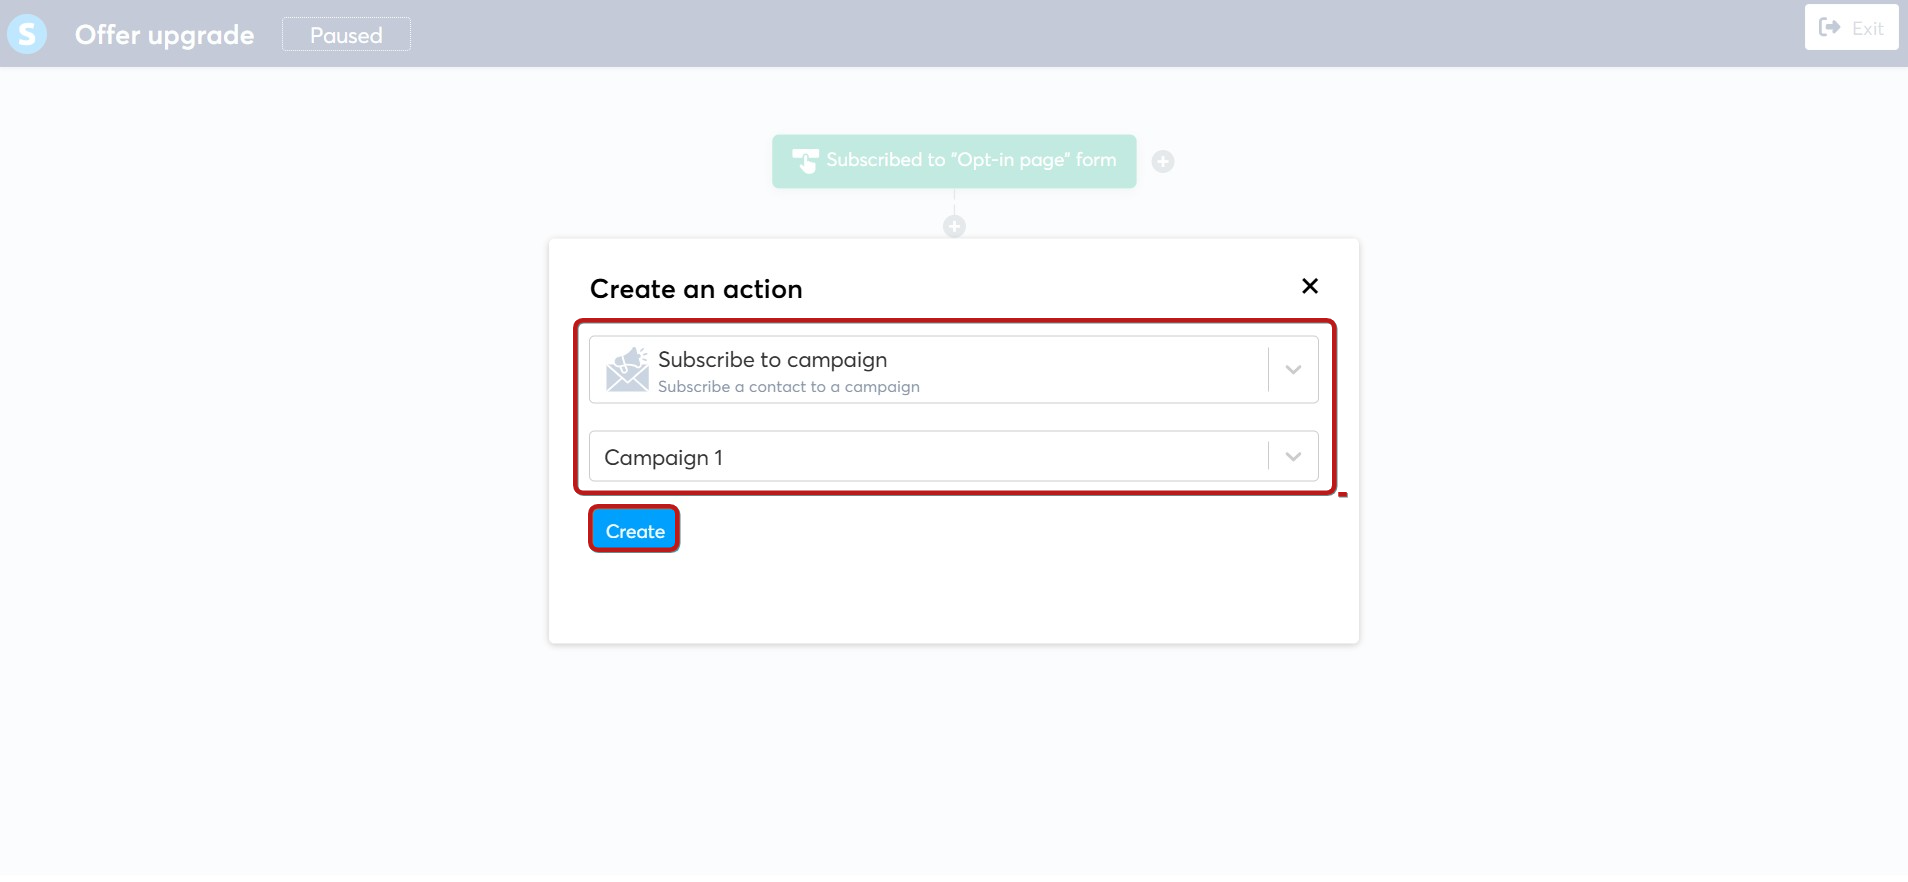
- Subscribe to campaign
- Unsubscribe from campaign
- Send webhook
- Send an email
- Send email to specific address
- Send SMS
- Grant access to a community
- Revoke access to a community
- Enroll in a course bundle
- Revoke access to a course bundle
- Add a new row to a Google Sheet
- Add to a pipeline stage
- Decision: Branch the workflow depending on the contact’s characteristics (using filters).
- Delay: Insert a waiting period before moving to the next step.
Note: If you choose the Exact date delay type, a timezone selector will appear next to the date field. Your account's default timezone is pre-selected, but you can change it to any timezone you need.

Let’s create a sample workflow to illustrate how to use these elements.
Workflow background:
- You are selling two offers.
- You have two campaigns: Campaign 1 promotes Offer #1, and Campaign 2 promotes Offer #2.
- An automation rule assigns the Customer 1 tag to every buyer of Offer #1.
Workflow sequence:
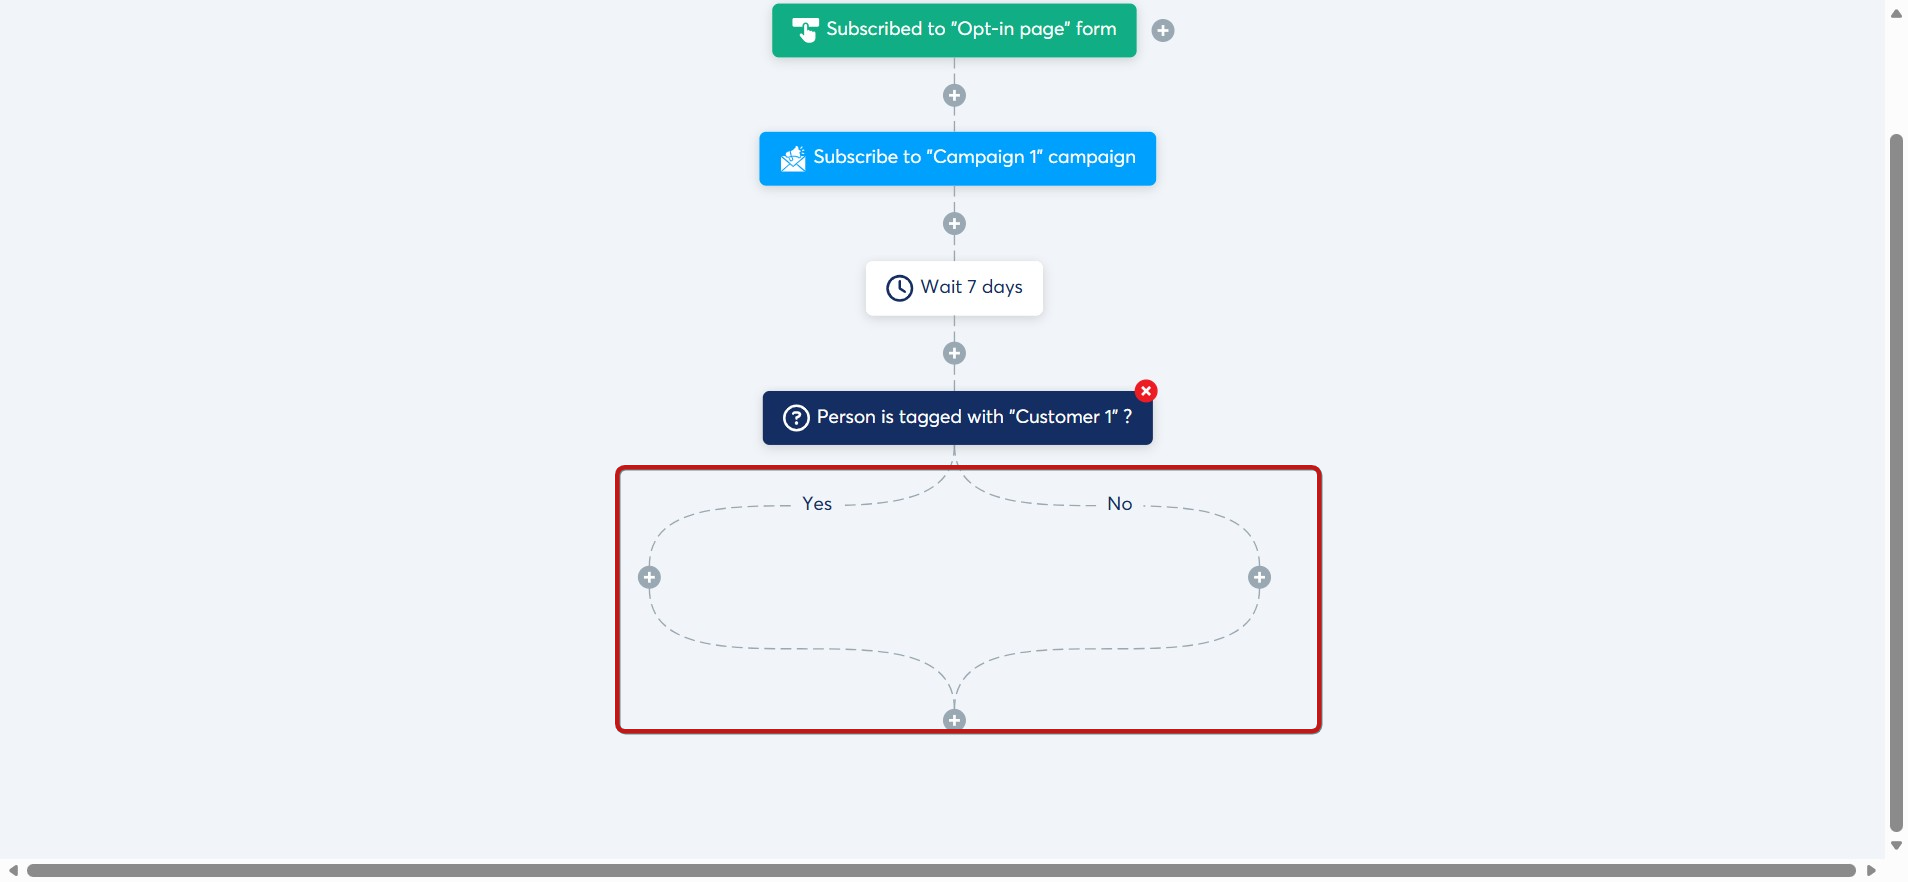
a. When a lead subscribes through the opt-in page, subscribe them to Campaign 1 to promote Offer #1.
b. If they buy Offer #1:
- Unsubscribe them from Campaign 1.
- Subscribe them to Campaign 2 to promote Offer #2.
Steps to follow:
- Create a trigger: Choose Funnel form subscribed and select the opt-in page. Click on Create.
- Add an action: Choose Subscribe to campaign and select Campaign 1.
-
Add a delay of 7 days so the contact has time to receive emails from
Campaign 1.
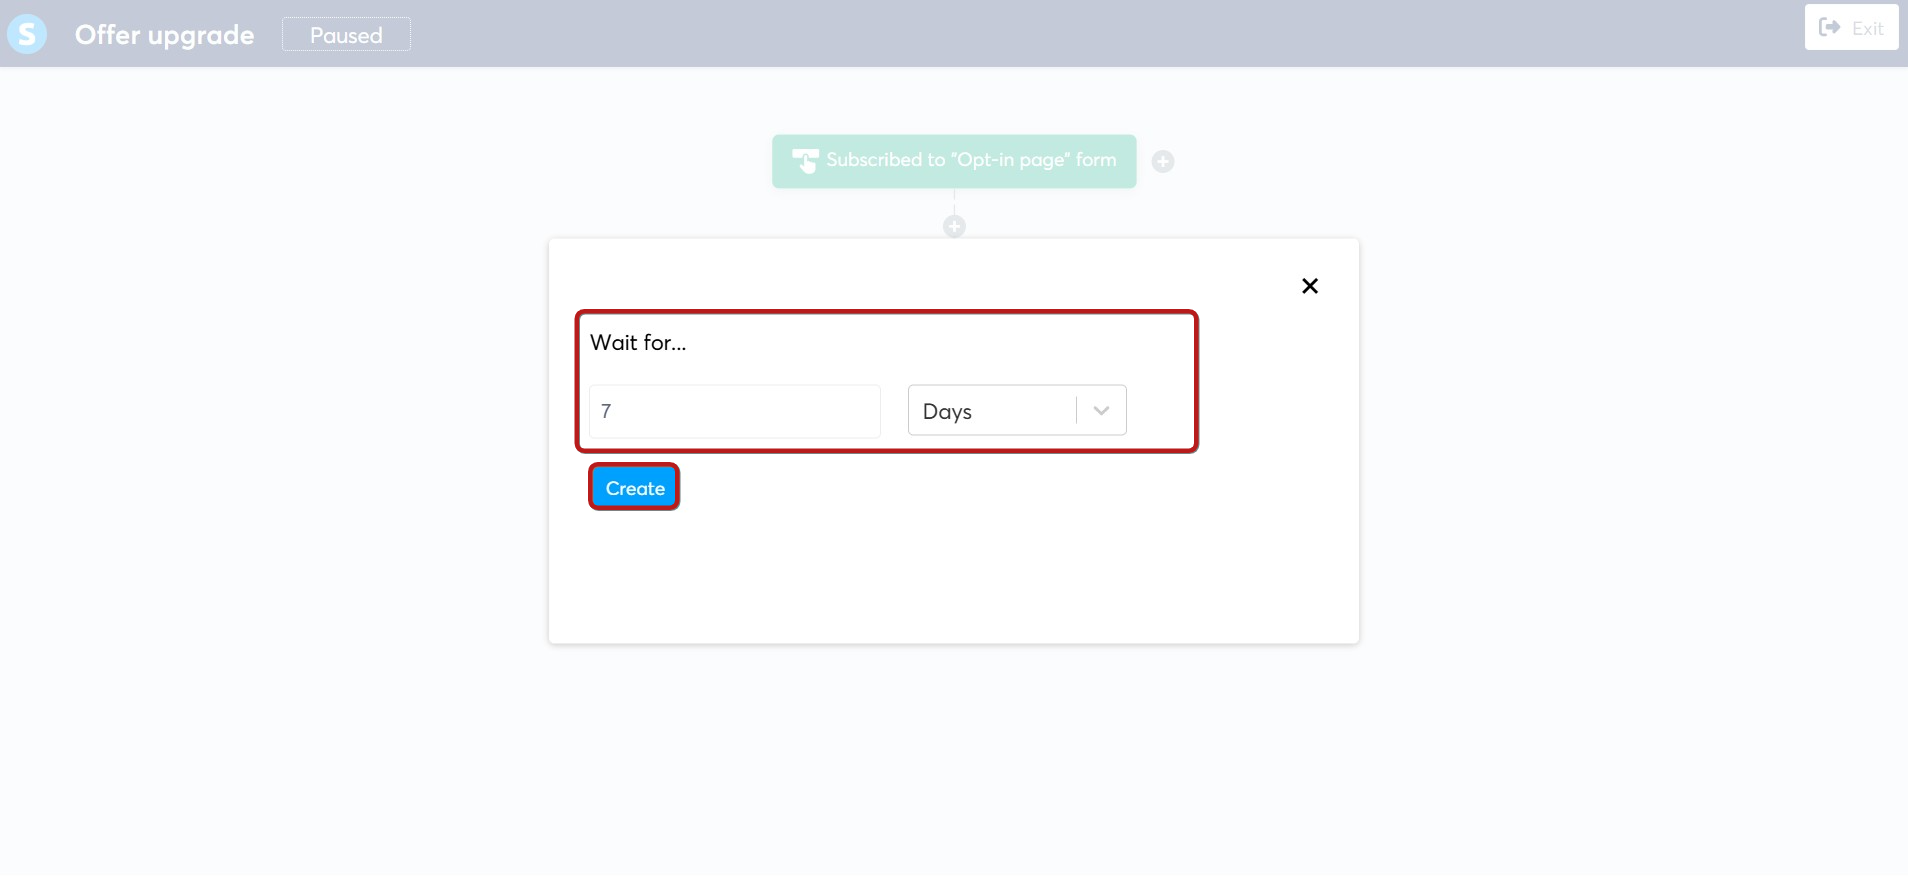
Note: Editing the duration of any delay step will only affect new contacts entering that step. Contacts who are already waiting at that step will not be affected.
For this scenario, if you later change the delay from 7 days to 14 days, the contacts already waiting will still complete their original 7-day delay. The new 14-day timeframe will only apply to new contacts entering the workflow.
-
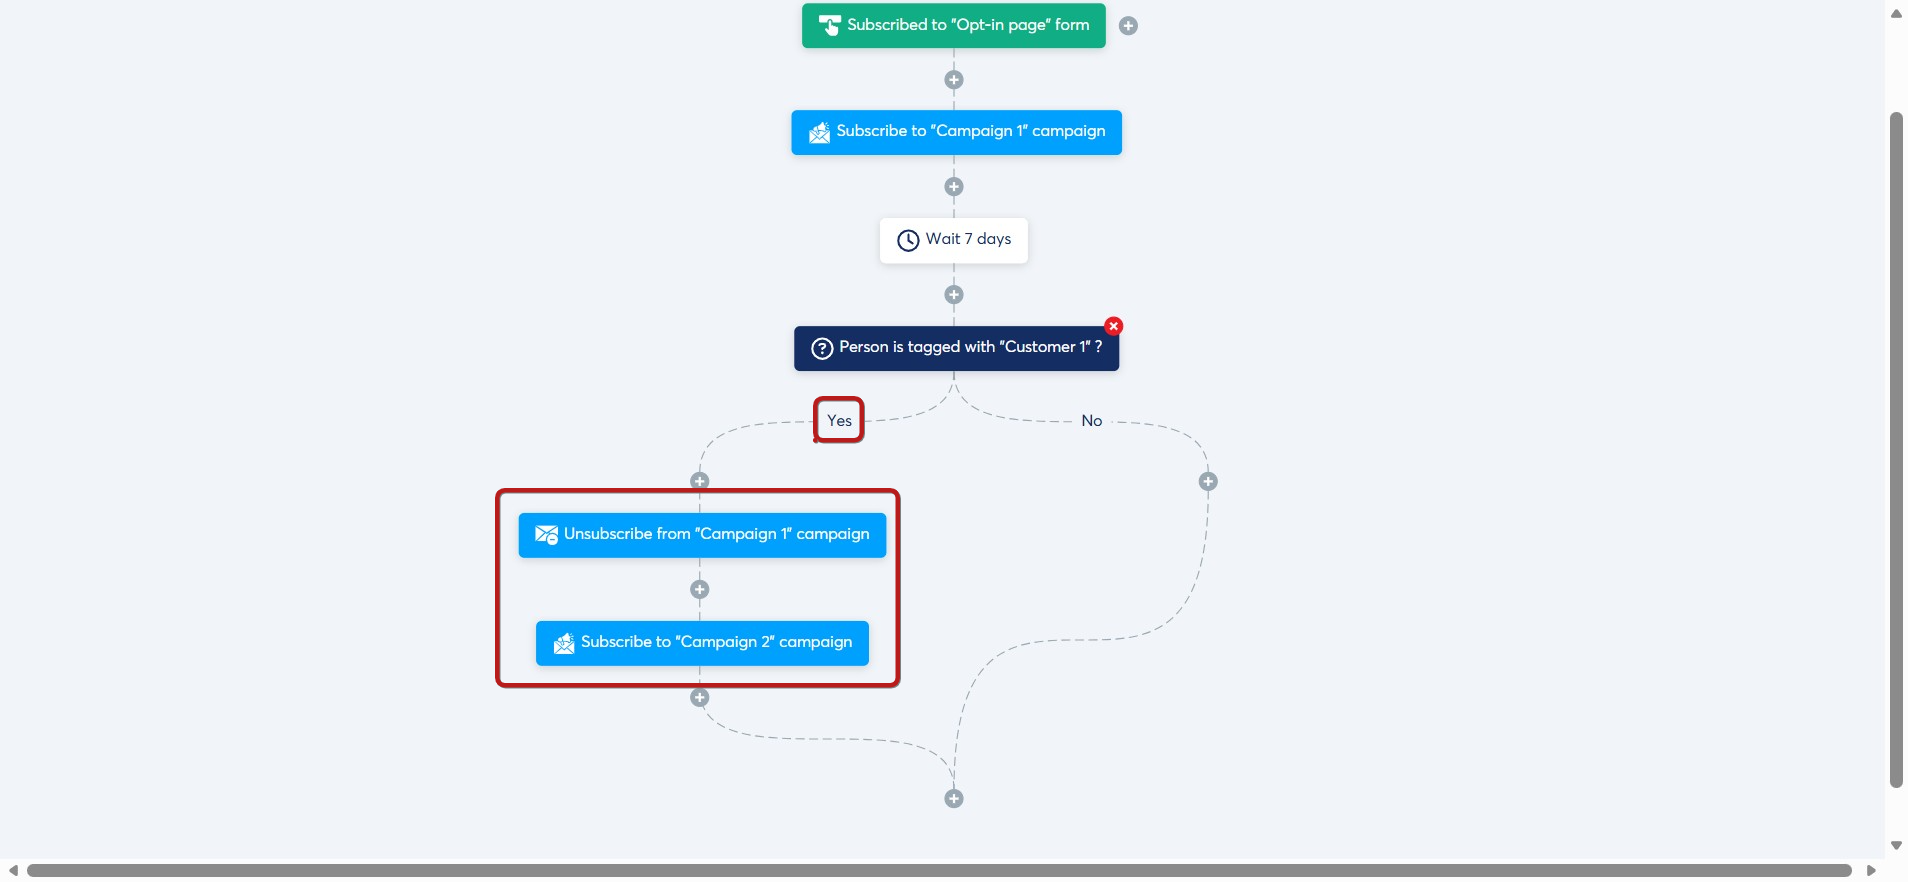
Add a decision: Use the Tag filter → Contact tagged with → choose
Customer 1.
You can always add another group of conditions.
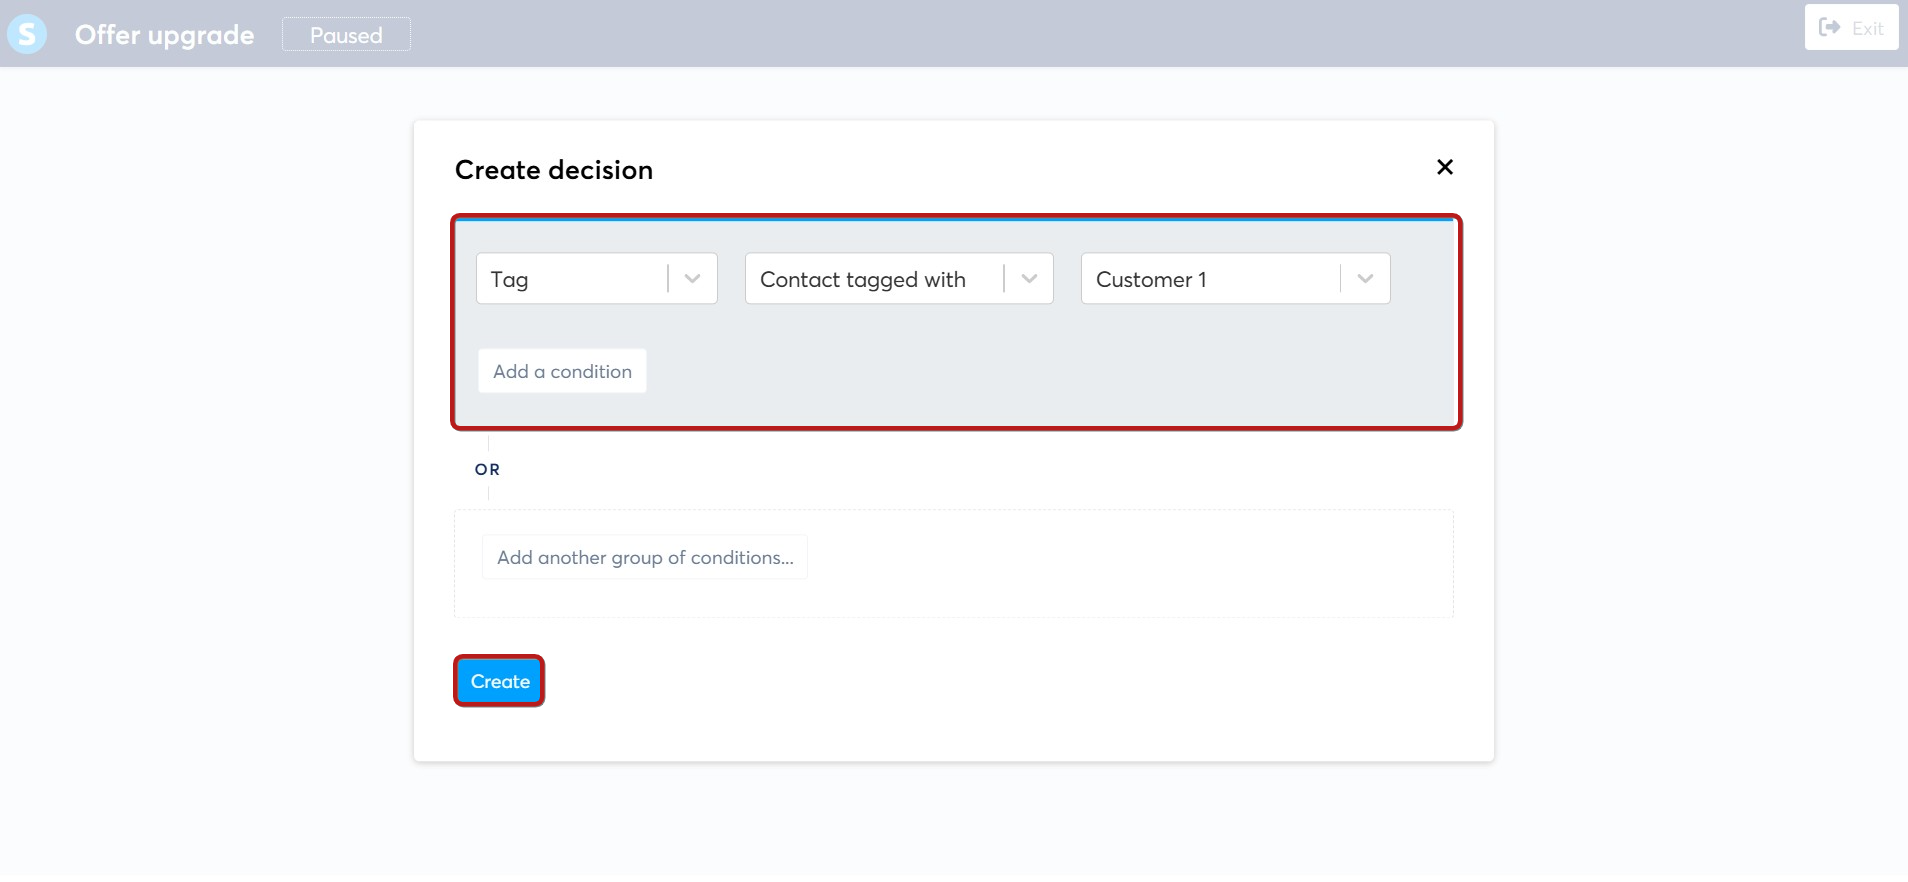
- After the decision, there are two possible paths:
- No: The contact doesn't have the Customer 1 tag (they haven’t purchased yet)
- Yes: The contact has the tag (they’ve purchased)
If yes, add two more actions :
- Unsubscribe from Campaign 1
- Subscribe to Campaign 2
Once the workflow is configured, you must activate it.
Activating the workflow
To activate the workflow, go to the workflow list and hover over the three dots (...) next to the workflow, and click Activate.
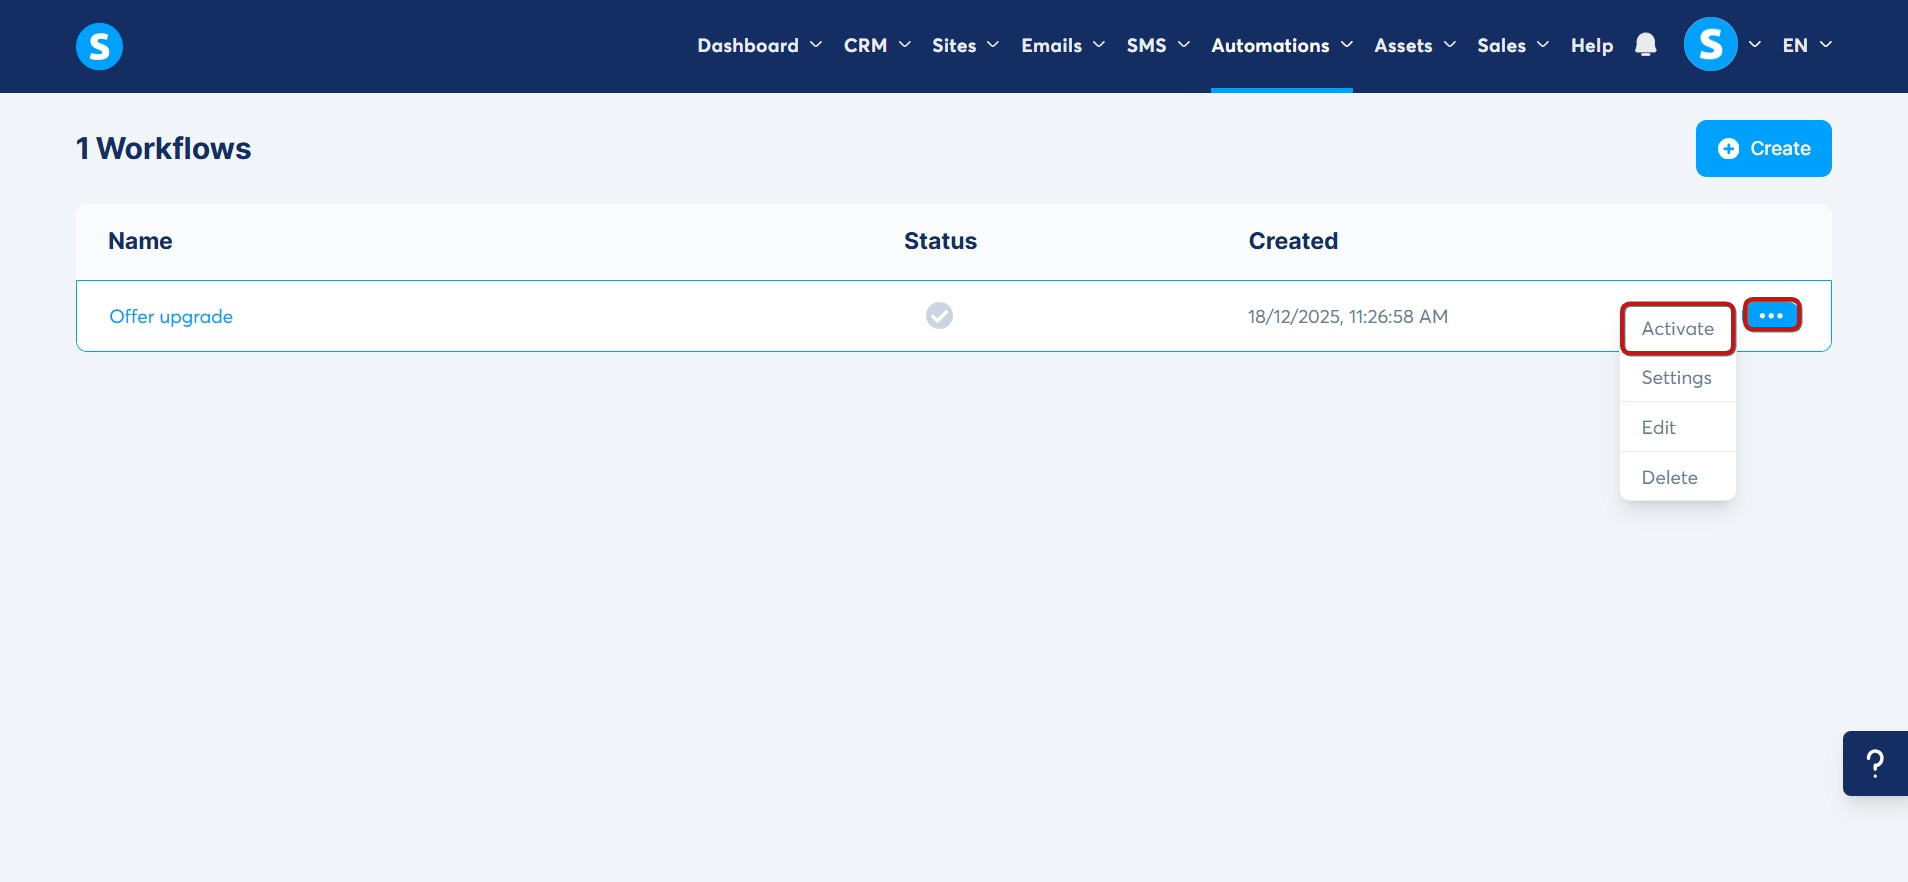
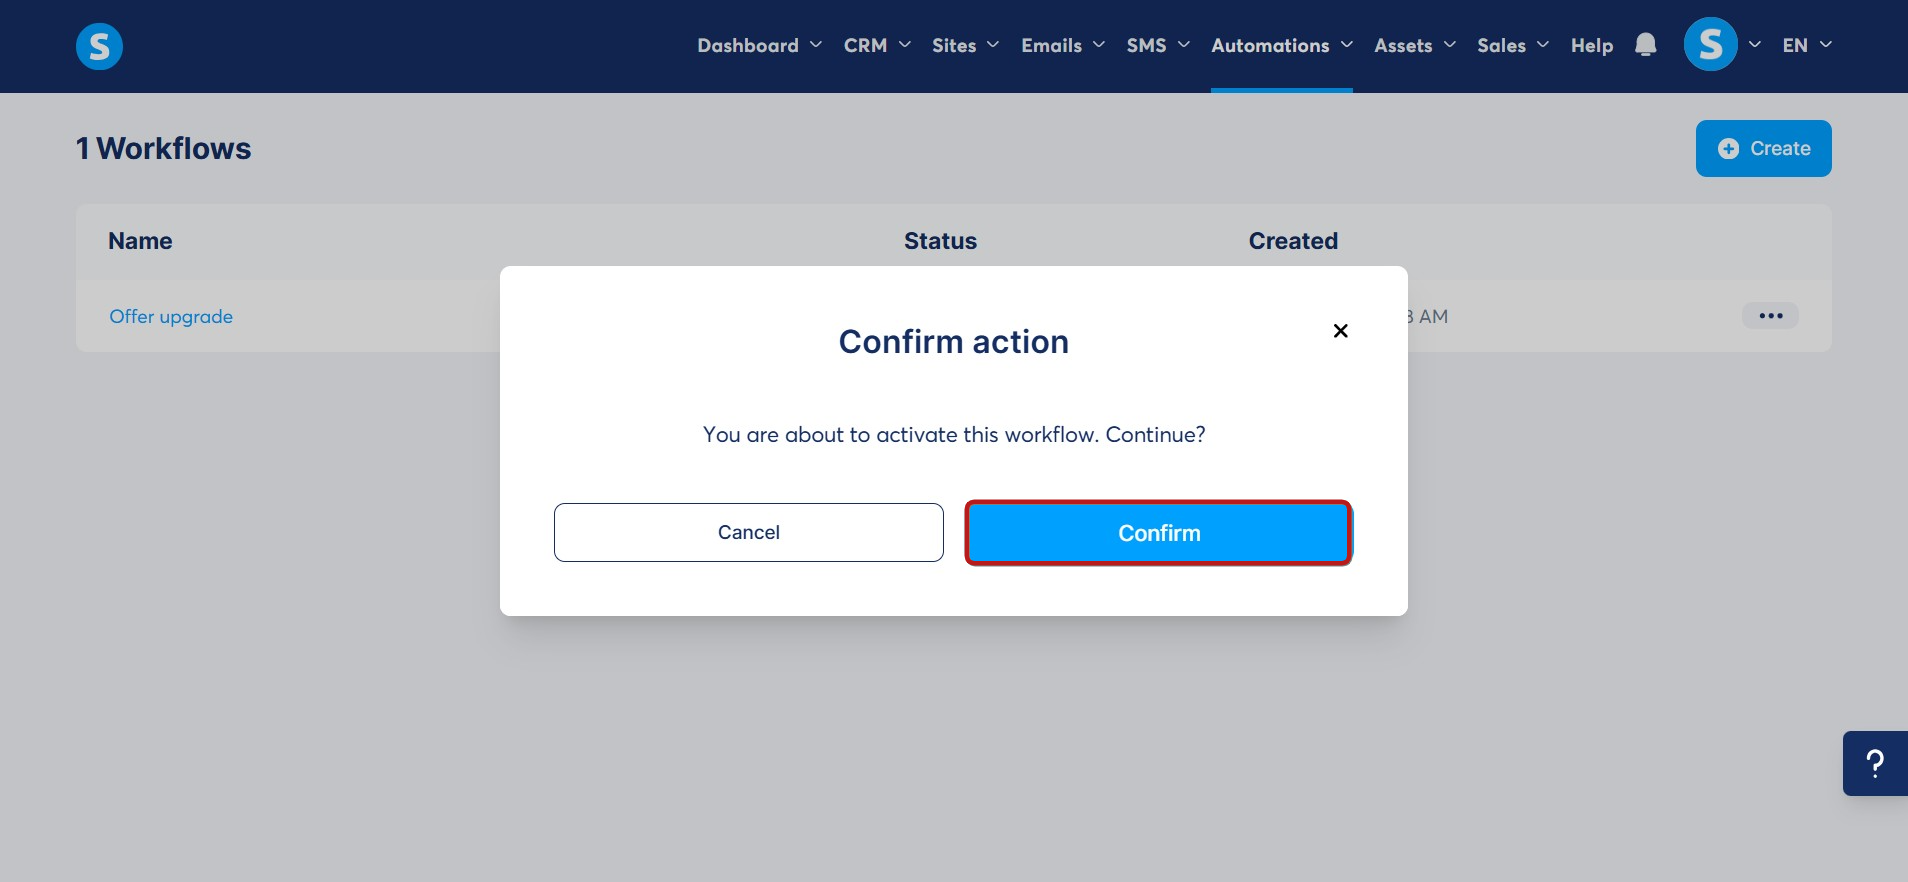
On the popup that appears, click Confirm.
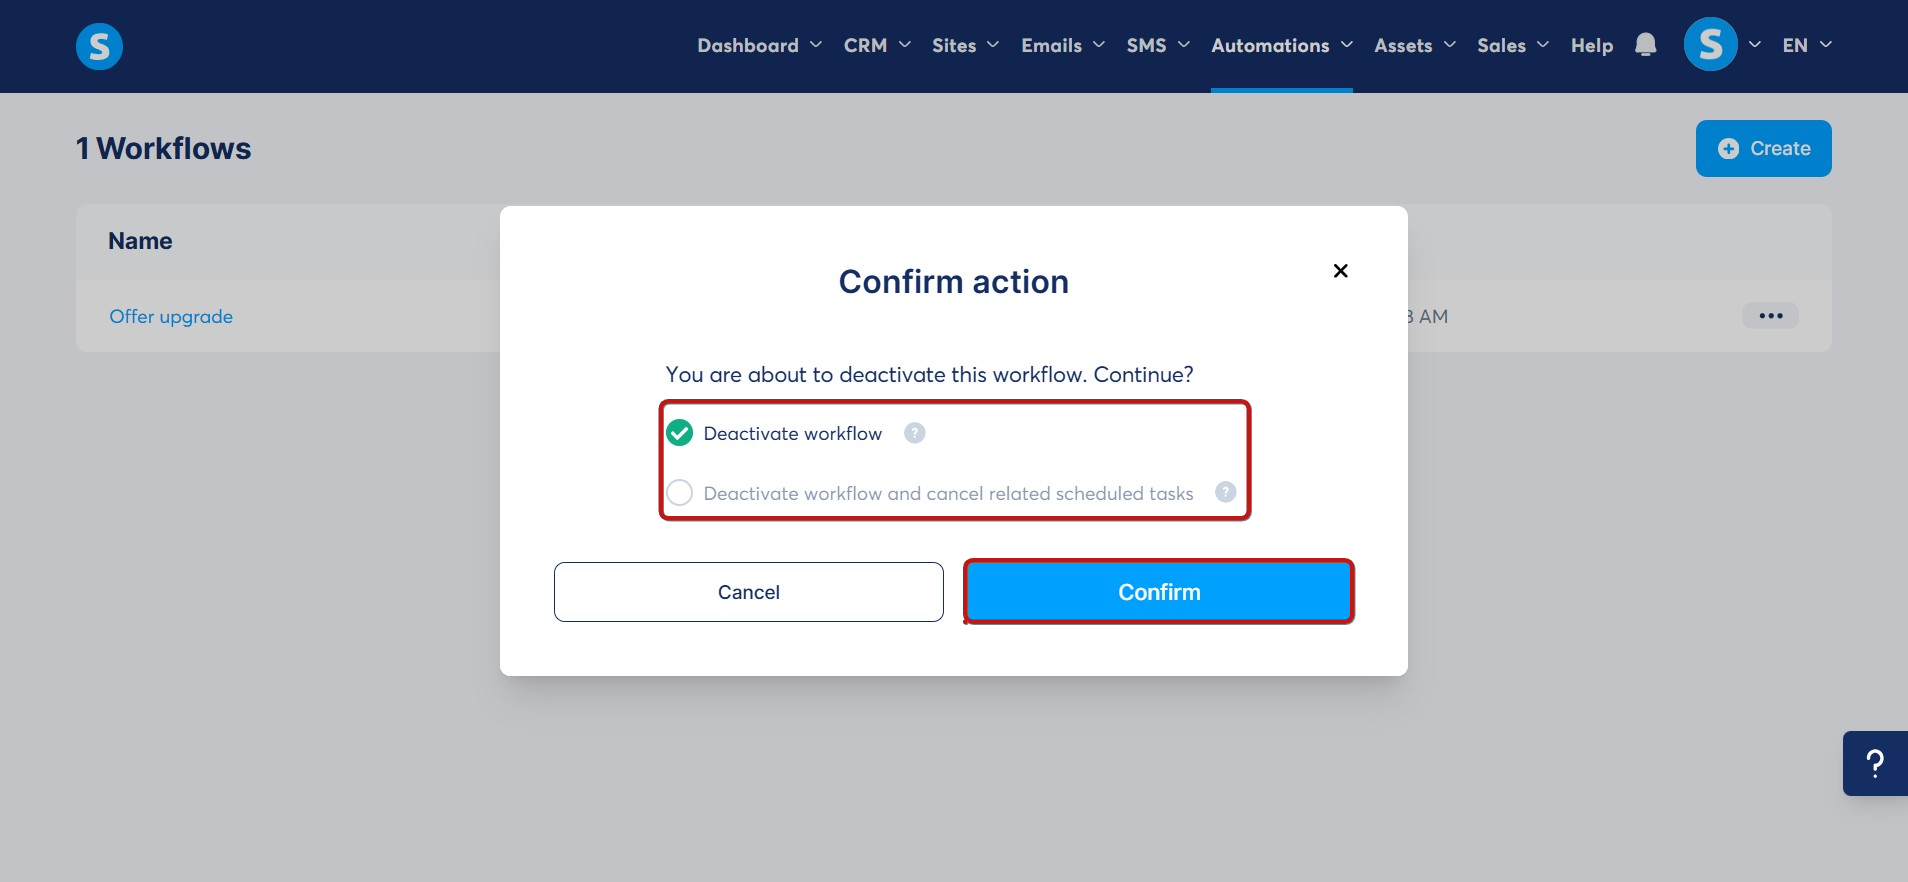
Deactivating the workflow
To deactivate a workflow, go to the workflow list and hover over the three dots (...) next to the workflow, and click Deactivate.

You’ll be given two options:
- Deactivate workflow: Stops new contacts from entering, but existing scheduled tasks will continue.
- Deactivate workflow and cancel related scheduled tasks: Prevents any further scheduled actions from being executed.
Choose the option that fits your needs, then click Confirm to finalize.
Sharing the workflow
You can easily share your workflows with other systeme.io accounts using a simple shareable link. When you share a workflow, all the assets directly connected to it, such as tag, courses, funnels, webinar funnels (including webinar notification emails), etc., are shared, ensuring it works perfectly in the recipient's account without them needing to rebuild anything from scratch.
From your workflows list, click the three dots (...) next to the workflow you want to share, then click Share (1).

A popup will appear with a shareable URL. Click Copy the link to your clipboard (2).

When the recipient receives and clicks the link:
- The workflow will begin importing into their account, and they will receive a notification in their dashboard showing the sharing progress (they can cancel the import by clicking the X on the notification).

- Once the sharing is complete, a final "Workflow was imported successfully" notification will appear.

- The imported workflow can then be accessed directly from their Workflows page.

Important: Most workflow triggers, actions, and conditions are fully shareable. However, because some elements rely on highly specific external connections or upcoming platform changes, the following elements are not included when a workflow is shared:
- Triggers: "Blog page form subscribed" and "Creator store form subscribed".
- Actions: "Add a new row to a Google Sheet" and "Send webhook".
Additional information:
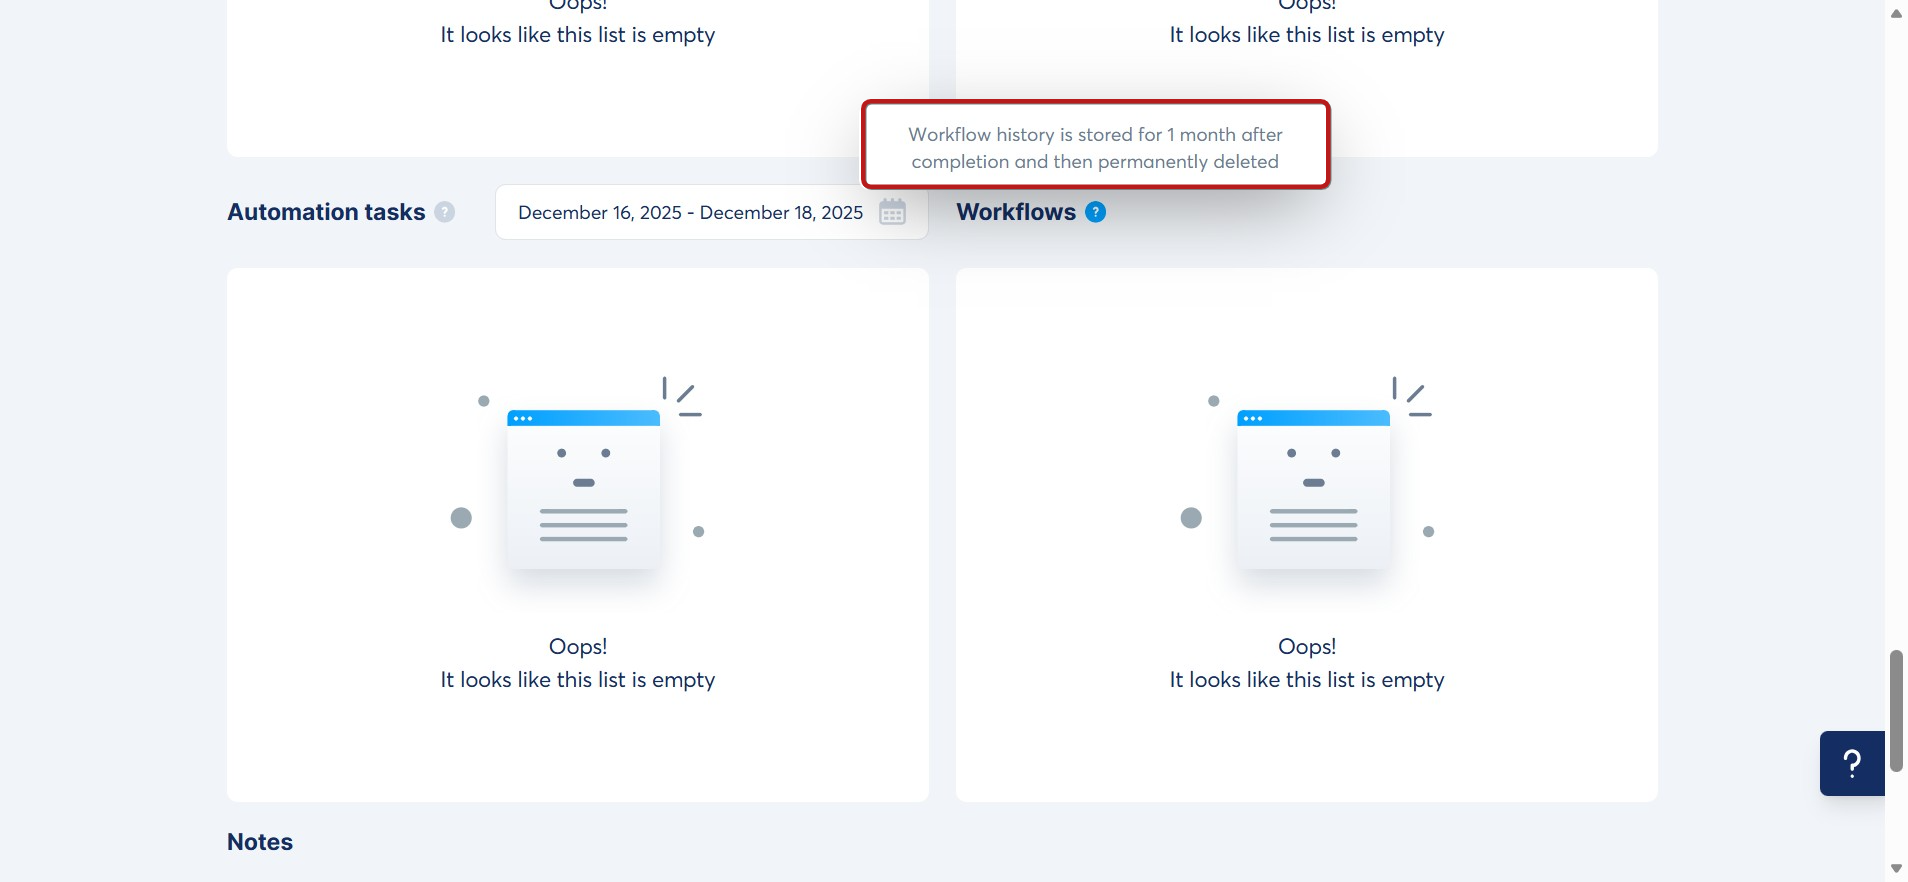
Workflow execution history is stored for only one month. After this period, it is automatically removed from the system for data optimization.
If you can’t find a past workflow task in a contact’s page, it means the task was over one month old and has been removed during system cleanup.
Note: The dates and times displayed throughout your workflows (including scheduled delays and execution logs) automatically follow the format and timezone configured in your main account settings.